We've reached the home stretch in the making of our Sarah Shirts! Today we'll be tackling the collar and plackets, and wrapping things up in the next post with some hemming and finishing touches...
*To be taken to all of the posts in the Sarah Shirt Sewalong, please click here!*
Today we will be:
- Assembling the collar
- Attaching the collar to the neckline
- Sewing the plackets
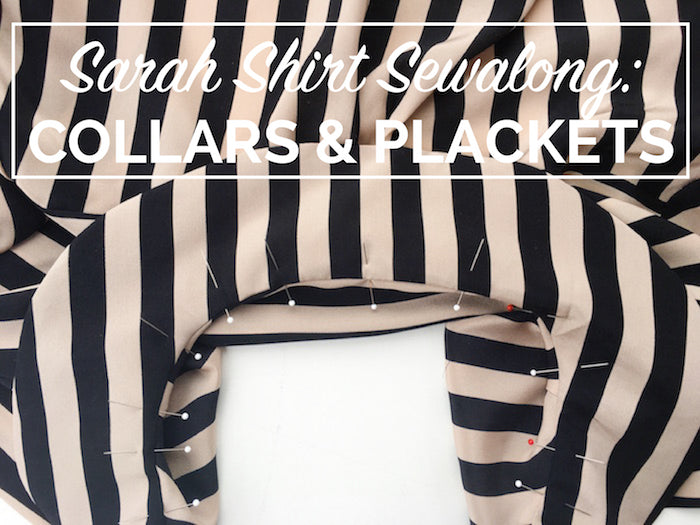
The collar
The first thing you'll notice about the collar pieces is that the under collar is ever so slightly smaller than the top collar. Why? When you join the two collar pieces together at the outer edge, easing the smaller one to fit the larger, you'll see that when pressed out to the right side, the smaller under collar naturally rolls underneath, thereby giving a smooth, clean collar curve, with the top/under collar seam hidden away underneath. The slight tension of the eased in under collar also helps the collar as a whole to sit flat on the shoulders, so double bonus!

Pin your top and under collar pieces at the outer curve, right sides together. To ensure that you're easing the under collar in the right places, take care to match the notches as you're pinning the two collar pieces together.

We're going to start our line of stitching 3/8" or 10mm in from the beginning of the outer edge, so if it helps you to mark this point with a pin or a fabric pen, go ahead and do that now.


Stitch all around with 1/4" or 6mm seam allowance. Notch carefully into the seam allowance.

Turn to the right side and press, rolling that outer edge seam in towards the under collar.


Before we join the collar to the shirt at the neckline, we just need to prep the placket...
At the first notch, press the placket (vertically) to the inside of your shirt.

Fold and press your placket in again by the same amount so that the first fold meets the innermost notch. You should also have a notch pointing down the centre of your placket - this notch is indicative of the shirt's centre front, and is the line down which we'll be positioning out buttonholes and buttons later on.

Now you want to unfold that second press, keeping that first pressed fold in place, and fold it back on itself to the right side of the shirt - no pressing here! Again matching the notches, place a pin to secure and baste - 3/8" or 10mm from the neckline's raw edge - from the edge of the placket, but not going past that centre front point. Doing this creates a neat finish to the top of the placket. Repeat for the placket on the other side.


Now, back to the collar...
Take your collar and pin the raw inner curve of the top collar to the wrong side of your shirt's neckline, matching notches. The edge of your collar should reach that centre front notch that runs down the centre of your plackets.

Stitch all around the collar with 3/8" or 10mm seam allowance, keeping the plackets out of the way.
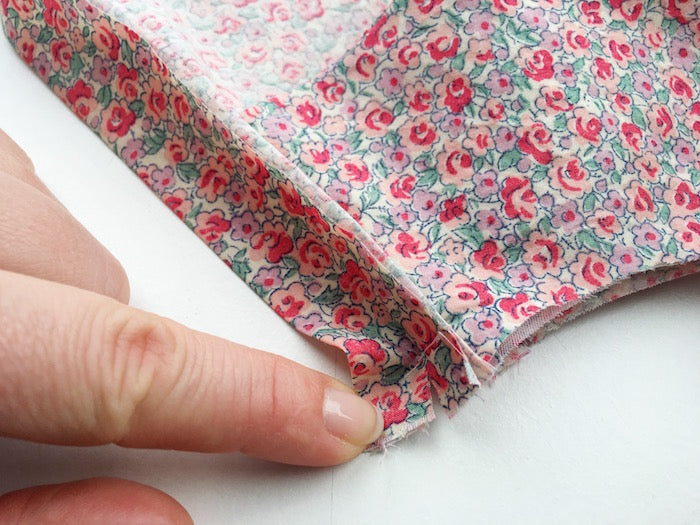
Clip into the seam allowance to release the tension, enabling you to press that neckline seam into the collar. You'll also need to make a little clip into the neckline seam allowance by that centre front notch where the collar's edge meets the placket to enable you to turn the plackets back to the inside.

Clip into the curves of the unstitched edge of your under collar and press in. How much you press it in by should actually depend on how you plan to finish your collar - if you're going down the hand sewn slip stitch route (totally flawless and in my mind the best way to finish the under collar), press in the unstitched edge of your under collar by the same 3/8" or 10mm that you stitched the neckline with, pin into place along the neckline and sew into place by hand with a blind slipstitch.


Or, if you plan to finish your collar at the neckline by "stitching in the ditch" by machine, press that unstitched edge in by a slightly smaller 1/4" or 6mm (this ensures that when you stitch in the ditch from the inside of the neckline, you'll be sure to catch the under collar as you go) and pin from the inside of your shirt's neckline - put the pin through at that neckline seam (this is the "ditch") and out an inch or so into the collar.


When you flip your collar over, check that you've caught that unstitched fold of the under collar in your pins...

...And when you're happy, go ahead and stitch in the ditch from that inside neckline seam (where the top collar meets the inside of your shirt - all sounds a bit confusing here, I know!) to secure the under collar.
Phew! Collar pretty much done! If you've been topstitching the yoke of your shirt, then it is an idea to also topstitch the collar to keep things consistent. I've left both the pointed collar of my floral Variation 2 Sarah and the rounded collar of my stripy silk Variation 1 Sarah plain, seeing as I didn't topstitch the yokes. I am, however, going to edgestitch the rounded collar of my blue viscose Sarah (the one that wasn't looking great in the photos so got replaced by the stripy one!), and I'm kind of considering a length of ricrac trim peeking out from the under collar of my floral Sarah to nod to the ricriac I added to the sleeve's cuff. Gonna sleep on that one for now...!
The plackets
Not a huge amount left to say about the plackets now as most of it was prepped while we were dealing with the collar! With both of your plackets already pressed and finished at the neckline, all that's left to do is stitch them down vertically from the neckline down to the hem, parallel to the centre front fold.

I thought it would be a little cruel to tackle both collars and buttonholes in one sitting, so you can all relax - we're done for today!
Up next: We'll be hemming our shirts and putting the final finishing touches - marking and sewing some buttonholes, sewing on the buttons, talking about alternative fastenings such as snaps, and maybe even a bit of extra-curricular embellishment...!
-
Elisalex de Castro Peake

Comments on this post (1)
Thanks,
I needed this detail view to supplement the instructions.
— Paula